This website uses cookies to improve your experience. We'll assume you're ok with this. Know more.

How to View Risky Sign-ins Report in Entra ID

Are you discovering sign-ins from unfamiliar places, off-peak hours, or different devices in your Microsoft 365 environment? If so, it could be a sign of a significant security risk, potentially exposing your data to cybercriminals. Don't panic! Learn how to check the risky sign-ins report and enforce risk-based policies, securing your organization from hazardous login attempts!

Native Solution

Microsoft 365 Permission Required

High

Global Admin, Security Admin, Security Reader, Global Reader, or Reports Reader.

Option 1 Using Microsoft Entra Admin Center

  • Login to the Microsoft Entra admin center.
  • Navigate to the Risky activities tab under Identity»Protection.
  • Select the Risky sign-ins tab under the Report section. Here, you can view your organization’s risky sign-in data for the past 30 days.
Using Microsoft Entra Admin Center
  • You can also refer to the Risky users tab to view all risky users in your organization.

Option 2 Using Windows PowerShell

  • Connect to the Microsoft Graph PowerShell using the below cmdlet.
  • Windows PowerShell Windows PowerShell
     Connect-MgGraph
  • Run the below cmdlet to display high-risk users in Azure AD using PowerShell.
  • Windows PowerShell Windows PowerShell
     Get-MgRiskyUser -Filter "RiskLevel eq 'high'" | Format-Table UserDisplayName, RiskDetail, RiskLevel, RiskLastUpdatedDateTime
Using Windows PowerShell
AdminDroid Solution
More than 150 reports are under free edition.

AdminDroid Permission Required

Any user with report access delegated by the Super Admin.

StepsUsing AdminDroid

ad
  • Login to the AdminDroid Office 365 reporter.
  • Navigate to the Confirmed Risky Sign-ins report under Analytics»Sign-in Analytics»Risky Sign-ins.
Using AdminDroid

Here, you can view the risky sign-ins that are remediated, dismissed, compromised, etc. You can also refer to the Open Risky Sign-ins report for risky user sign-ins that are not resolved.

risky-chart
  • Utilize the built-in graphical representation to visually exhibit the IP addresses associated with risky sign-in attempts.

Monitor Entra ID risky sign-ins with ease!

Neglecting risky sign-in reports is like allowing cyber intruders to access your data. Secure your Microsoft 365 organization by monitoring sign-in activities using AdminDroid.

Witness the report in action using the

Azure ADMonitor Entra ID Risky Sign-ins to Prevent User Identity Compromises in Microsoft 365

Showing 1 of 6

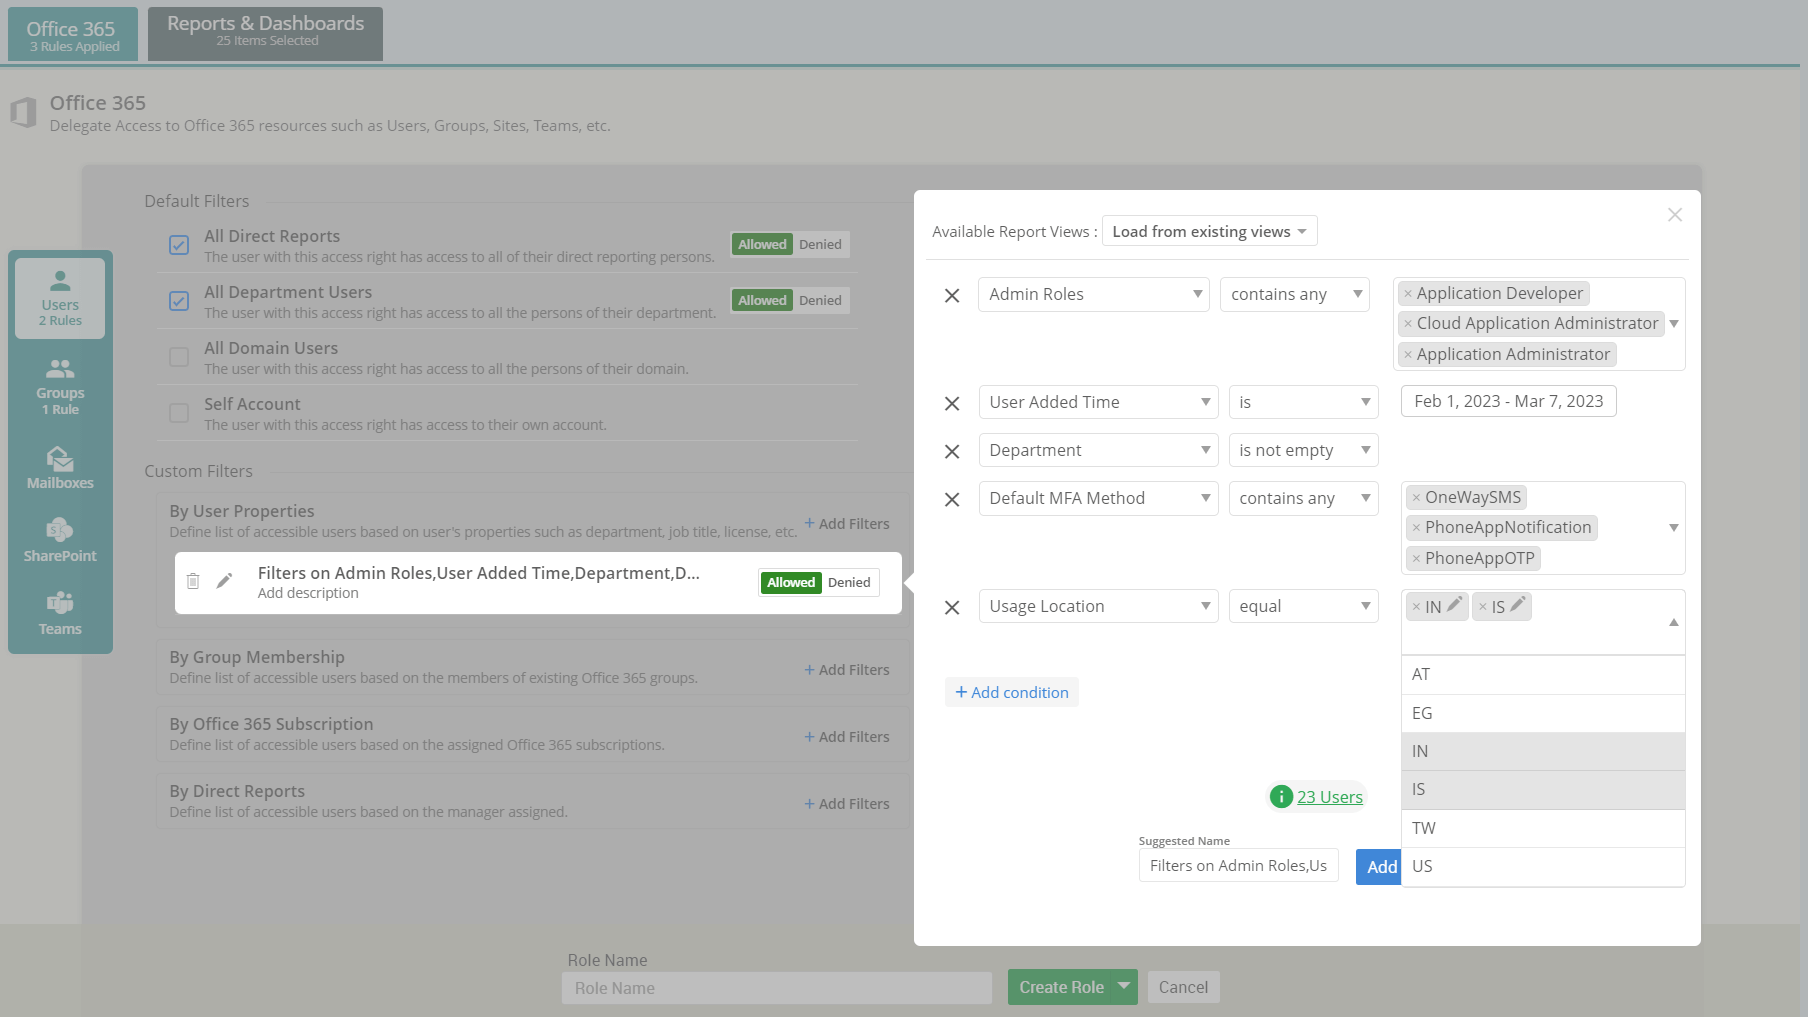
What are the risks of Azure AD sign-ins?

A risky sign-in is detected when a Microsoft 365 user account is accessed from unusual patterns. Microsoft Entra ID protection analyzes the risk factors associated with a sign-in event and categorizes risky sign-ins into three levels: low, medium, and, high. You can configure risk-based policies based on these risk levels to safeguard your organization.

Some common risk factors that are considered for detecting risky sign-ins in Azure AD are,

  • Password spray attack : This happens when an attacker makes multiple sign-in attempts to various user accounts using a set of common passwords in a short timeframe.
  • Impossible travel : It occurs when a user account is accessed from two distant locations within a short period.
  • Unfamiliar sign-in properties : This situation arises when there's an effort to sign-in from properties that differ from the user's usual sign-in history. These properties include IP address, location, device, browser, and tenant IP subnet.
  • Malicious IP address : This occurs when a user attempts to sign in from an IP address, which is deemed malicious due to a high number of login failures resulting from incorrect passwords.

How to check risky sign-ins in Azure AD?

As a security admin, it is important to monitor Azure risky sign-ins to prevent unauthorized access and potential compromise of user accounts. Identifying and responding to suspicious activities allows you to take proactive measures to secure user accounts in the future.

Follow the below to get a risky sign-ins report that helps you to detect and remediate risky sign-ins.

  • Using Microsoft Entra Admin Center Navigate to the Risky activities tab under Identity»Protection. Select the Risky sign-ins tab under the Report section to view the risky sign-ins of your Microsoft 365 environment.
  • Microsoft PowerShell Run the below cmdlet in MS Graph PowerShell to find the high-risk users in Azure AD.
Get-MgRiskyUser -Filter "RiskLevel eq 'high'" | Format-Table UserDisplayName, RiskDetail, RiskLevel, RiskLastUpdatedDateTime

Unfortunately, it is not possible to view the sign-in details of these risky users using PowerShell cmdlets. Although the Microsoft Entra admin center offers comprehensive details on risky sign-ins, it lacks a dedicated report for sign-ins that are at risk.

Using AdminDroid, you can find open risky sign-ins in your Microsoft 365 environment and decide to mark them as compromised or safe.

  • Here, you can get entire details on the risky sign-ins report such as signed-in user, risk detected time, risk level, risk event type, etc.
  • Click on the "Create alert for this report now" icon to create an alert policy to get notified about the risky sign-ins in your organization.
risky-alert

Pro Tip: Configure the "Threshold" property while creating the alert policy. This will trigger notifications if the specified number of risky sign-ins take place within the defined timeframe.

How to investigate risky sign-ins in Microsoft Entra ID?

Microsoft Entra ID offers a range of reports that can help investigate risky sign-ins within your organization. These reports include risky sign-ins, risk detections, and risky users. You can find these reports under Identity»Protection»Risky activities from the Microsoft Entra admin center.

Risky sign-ins report

This report displays all the risky sign-ins across your organization. It contains filterable data for up to 30 days. After reviewing this report, you can choose either "Confirm sign-in compromised" or "Confirm sign-in safe".

  • Confirm sign-in compromised : If you conclude that the sign-in wasn’t performed by the identity owner, you can choose this option. This moves the sign-in risk level to "High" and the risk state to "Confirmed compromised". If a sign-in risk policy is configured to force high-risk sign-ins to perform MFA, the sign-in event gets remediated the next time the user signs in.
  • Confirm sign-in safe: If you conclude that the sign-in was performed by the identity owner, you can choose this option. This moves the sign-in risk level to "None" and the risk state to "Confirmed safe".

Risky detections report

This report displays all the risk detections across your organization. In addition to sign-in activities, these detections also consider the user's behaviour across various Microsoft 365 services. It contains filterable data for up to 90 days.

What reports contain the ability to block users from signing in?

Risky users report in Microsoft Entra ID has the option to block users from signing in. It displays users who have one or more risky sign-ins or risk detections on their Microsoft 365 accounts. You can click on the user to see their recent risky sign-ins, risks detected on their activites across various Microsoft 365 services, and risk history. After reviewing these details, you can choose any of the options available as mentioned below.

  • Reset password : Selecting this option generates a temporary password for the user, which you can provide to them. After they sign in with this password, their risk state will be marked as "Remediated".
  • Confirm user compromised: If you conclude that the user account is compromised after reviewing their sign-in activities, you can choose this option. This moves the user risk level to "High" and the risk state to "Confirmed compromised". If this user is included in your user risk policy to force high-risk users to reset passwords, the user will be remediated the next time they sign-in.
  • Dismiss user risk : Choosing this option confirms that the selected user is not at risk. Microsoft Entra ID will dismiss risk for the selected user and their existing risky sign-ins and detections. This marks the risk state as "Dismissed".
  • Block user : Choosing this option blocks the user from signing in. You can unblock them later.
risky-user-details

What are the prerequisites for self-remediation when risks are detected?

Manual remediation is recommended only for low and medium-risk sign-ins. However, high-risk sign-ins require self-remediation with risk policies to prevent unauthorized access. The two types of risk policies in Microsoft Entra ID are,

  • User risk policy,
  • Sign-in risk policy.
  • User risk policy : You can remediate risky users by setting up a user risk policy. It can be created by navigating to Identity»Protection»Identity Protection from the Microsoft Entra admin center. In the User risk policy section, set the User risk to "High". This policy allows only the password change option for self-remediation. Keep Policy enforcement as "Enabled" and click on Save.
  • Sign-in risk policy : You can remediate risky users by setting up a sign-in risk policy. In the Sign-in risk policy section, set the Sign-in risk to "High". This policy allows only the multifactor authentication option for self-remediation. Keep Policy enforcement as "Enabled" and click on Save.

Using AdminDroid, you can easily find the type of risk detected by referring to the "Risk Event Types" column of the Confirmed Risky Sign-ins report.

  • You can then monitor Azure AD users' sign-in logs to access previous sign-in data related to the risky user. Analyzing this historical sign-in data will assist you in investigating risky sign-ins and determining the accuracy of the detected risk.
risk-event-types

Pro Tip: If you confirm that the detected risk is true, you can choose the "Confirm sign-in compromised" option. If you confirm that the detected risk is false positive, you can choose the "Confirm sign-in safe" option. Microsoft will provide this feedback to their machine learning systems for future improvements in risk assessment.

How to configure risk-based CA policies in Microsoft Entra ID?

While the risk policies in Identity Protection have limited controls for remediating risky sign-ins, risk-based Conditional Access policies offer a more comprehensive approach. Users can self-remediate when risks are detected by satisfying different requirements, including multi-factor authentication, password reset, device compliance, Microsoft Entra hybrid joined devices, etc. The two types of risk-based Conditional Access policies are,

  • User risk-based Conditional Access policy,
  • Sign-in risk-based Conditional Access policy.

Follow the steps below to create a risk-based Conditional Access policy in Microsoft Entra ID.

  • Login to the Microsoft Entra admin center. Navigate to Identity»Protection»Conditional Access. Click on "+ Create new policy".
  • Give a unique name to your policy. In the Users section, specify the users to be a part of this policy, or include all users. Under Target resources, select "All cloud apps".
  • In the Conditions section, configure "User risk" if you want to create a user risk-based Conditional Access policy. Here, you can select the user risk levels needed for the policy to be enforced. The recommended risk level is "High".
  • Configure "Sign-in risk" if you want to create a sign-in risk-based Conditional Access policy. Here, you can select the sign-in risk levels needed for the policy to be enforced. The recommended risk level is "High".
  • Under the Grant section, select Grant access and choose the required options. You can choose the "Require multifactor authentication" option to prompt users for MFA during sign-in.
  • Select "On" from Enable policy and click on Create.

When a risky sign-in is detected, users will need to perform MFA. Once the authentication is successful, the risky sign-in will be remediated.

AdminDroid Microsoft Entra ID ReportingStay informed about unusual login attempts!

The AdminDroid's Microsoft 365 sign-in analytics tool offers comprehensive reports on sign-in events throughout your organization. It efficiently displays user risk levels, details on users' risky sign-in events, and information on resolved risks, each with a dedicated report.

Secure your Microsoft 365 organization with AdminDroid's unique features for monitoring Entra ID risky sign-ins:

By tracking the Open Risky Sign-ins report, you can easily identify and assess potential risky sign-ins, allowing you to take immediate action based on the comprehensive details provided.

An Overview

Detailed MFA Reporting

AdminDroid offers an array of Azure AD MFA reports that assist you in configuring risk-based policies to mitigate risky sign-ins.

Microsoft 365 User Password Reporting

Explore AdminDroid's user password reports in Entra ID and optimize your organization's existing password policies to avoid password spray attacks.

Microsoft 365 Admins’ Login Failures

Audit admins’ failed sign-ins and enact proactive strategies to mitigate the risk of potential data breaches from these administrative accounts.

Alert Policies on Risky Sign-ins

Use AdminDroid's built-in risky sign-in alert policies and deploy the necessary ones tailored to your Microsoft 365 organization.

Microsoft Entra SSPR

Monitor user accounts that perform self-service password resets to detect any unauthorized attempts to reset passwords.

Entra ID Policy Modifications

Monitor changes in Azure AD Identity Protection policies to stay informed about any modified settings and revert them if they are considered insecure.

In summary, AdminDroid assists you in staying informed about Azure AD risky sign-ins and helps safeguard against potential security risks. With its extensive range of reports, you can configure risk-based policies based on the comprehensive details provided.

Kickstart Your Journey with AdminDroid

Your Microsoft 365 Companion with Enormous Reporting Capabilities!

Common Errors and Resolution Steps in getting the Risky Sign-in Report in Entra ID

The following are the possible errors and troubleshooting hints while dealing with risky sign-ins in Microsoft 365.

Error: Your account is blocked. We’ve detected suspicious activity on your account. Sorry the organization you are trying to access restricts at-risk users. Please contact your <your domain> admin.

This error occurs when you try to access a resource owned by another organization, which has implemented risk-based policies to block risky users.

Troubleshooting hint :Contact your admin to get your risk level reviewed and remediate it to allow access to other organization’s resources.

Error: Get-MgRiskyUser : You cannot perform the requested operation, required scopes are missing in the token.

This error occurs when the MS Graph module does not have permission to display the risky users.

Troubleshooting hint :Connect to the MS Graph PowerShell using the below cmdlet and permit to display risky users.

Connect-MgGraph -Scopes "IdentityRiskEvent.Read.All","IdentityRiskyUser.ReadWrite.All"

Error: Dismiss user risk greyed out.

This happens when you don’t have the necessary permission to dismiss user risk in your organization.

Troubleshooting hint :Ask your admin to assign the "Security Administrator" role which is the least privileged role to dismiss user risks in Microsoft 365.

Error: Your account is temporarily locked to prevent unauthorized use. Try again later, and if you still have trouble, contact your admin.

This error occurs when your account is blocked due to multiple failed sign-in attempts.

Troubleshooting hint :You can reset your password using Self-Service Password Reset if your organization has allowed you to do so. If not, please ask your global admin to reset the password.

Error: The term 'Connect-MgGraph' is not recognized as the name of a cmdlet, function, script file, or operable program.

This error will occur if the MS Graph module wasn't installed properly.

Troubleshooting hint :Install the MS Graph PowerShell module. If it is already installed, updating it could resolve the issue.

// Run the below cmdlet for installing it.
Install-Module Microsoft.Graph
// Run the below cmdlet for updating it.
Update-Module Microsoft.Graph